mardi 14 juin 2011

FOX Board : I2C

Pour utiliser l'I2C sur la Foxboard assurez-vous d'avoir la dernière version du noyau linux.
On va accéder aux périphériques I2C via l'interface /dev. Il faut d’abord charger le module i2c-dev.

Chaque périphérique I2C est assigné à un nombre entre 0 et 255 (je l’appellerai n dans la suite). Pour voir la liste des périphériques I2C installer "i2c-tools" et tapez la commande "i2cdetect -l":
debarm:~# apt-get install i2c-tools
debarm:~# i2cdetect -l
i2c-0   i2c             i2c-gpio-1                              I2C adapter


Les périphériques I2C sont représentés par des fichiers de périphérique en mode caractère avec 89 comme numéro majeur et n comme numéro mineur. On peut les trouver dans /dev.
Ils doivent être nommés "i2c-n". On peut en créer un manuellement :
debarm:~# mknod /dev/i2c-0 c 89 0

Pour travailler avec l'I2C il faut inclure la bibliothèque "linex/i2c-dev.h"  distribuée avec i2c-tools.

Voici une classe qui permet d'utiliser facilement l'I2C sur la fox, il faut lui donner l'adresse du périphérique et le numéro du périphérique (n). Si le fichier /dev/i2c-n n’existe pas, il est automatiquement créé.


I2C_Device.h :
/*
 * I2C_Device.h
 *
 *  Created on: 14 juin 2011
 *      Author: Eliott
 */

#ifndef I2C_DEVICE_H_
#define I2C_DEVICE_H_

#include "linux/i2c-dev.h" // a copier de la fox : /usr/include/linux et aussi types.h
#include <sys/ioctl.h>
#include <iostream>
#include <stdlib.h>
#include <fcntl.h>
#include <stdio.h>

using namespace std;

class I2C_Device {
public:
    I2C_Device(unsigned char slave_adress,int numero_device);
    ~I2C_Device();

protected :
    void writeNBytes(char bytes[],int n);
    void readNBytes( char bytes[],int n);

private :
    int device;
};

#endif /* I2C_DEVICE_H_ */


I2C_Device.cpp :
#include "I2C_Device.h"


I2C_Device::I2C_Device(unsigned char slave_adress,int numero_device) {
    char filename[20];
    sprintf(filename,"/dev/i2c-%d",numero_device);
    device = open(filename, O_RDWR);
    if (device < 0) { // si le fichier device n'existe pas
        cout<<"ERROR : "<<filename<<" n'existe pas, creation..."<<endl;
        char commande[40];
        sprintf(commande,"mknod /dev/i2c-%d c 89 0",numero_device);
        system(commande); // on le creer avec mknod
        usleep(1000);
        device = open(filename, O_RDWR);
        if (device < 0) { // on l'ouvre et c'est bon
            cout<<"ERROR : open"<<endl;
            exit(1);
        }
    }

    if (ioctl(device, I2C_SLAVE, slave_adress) < 0) {
        cout<<"ERROR : ioctl"<<endl;
        exit(1);
    }
}
//***********************************************************************

I2C_Device::~I2C_Device() {
    close(device);
}
//***********************************************************************
void I2C_Device::writeNBytes(char bytes[],int n){
    if (write(device, bytes, n) !=n) {
        cout<<"ERROR : write"<<endl;
    }
}
//***********************************************************************
void I2C_Device::readNBytes(char bytes[],int n){
    if ((read(device,bytes,n))!=n) {
        cout<<"ERROR : read"<<endl;
    }
}

lundi 13 juin 2011

FOX Board : Timer

J'ai eu besoin d'une classe gérant un timer sur la FOXBoard pour faire des lectures périodiques d'un gyroscope.
J'ai utilisé la fonction gettimeofday() de /sys/time.h qui a une precision supérieure à clock().
On peut définir une fonction à appeler périodiquement. Elle doit être du type : void fonction(void* data)

Cette classe utilise la bibliothèque pthread qui est normalement déjà installé sur la Fox. Il faut juste signaler à Eclipse qu'on l'utilise : Project->Properties->C/C++ General->Path and Symbols->Librairies->Add "pthread"

Timer.h :
/*
 * Timer.h
 *
 *  Created on: 12 juin 2011
 *      Author: Eliott
 */

#ifndef TIMER_H_
#define TIMER_H_

#include <sys/time.h>
#include <iostream>
#include "pthread.h"

class Timer {
public:

    Timer(int wait); // wait en ms

    void setCall(void(*fonction)(void*),void* arg); // fonction à appeler périodiquement
    void start();
    void stop();

private :
    static void* callRun(void* data);
    void run();

    int wait;
    void(*fonction)(void*);
    void* arg;
    struct timeval start_t, end_t;
    pthread_t thread;
};

#endif /* TIMER_H_ */


Timer.cpp :
#include "Timer.h"


Timer::Timer(int wait) {
    this->wait=wait;
    thread=0;
}
//****************************************************************************
void Timer::setCall(void(*fonction)(void*),void* arg){
    this->fonction = fonction;
    this->arg =arg;
}
//****************************************************************************
void Timer::start(){
    if(thread==0)
        pthread_create(&thread,NULL,callRun,this);
}
//****************************************************************************
void* Timer::callRun(void* data){
    Timer *t = reinterpret_cast<Timer*>(data);
    t->run();
    return NULL;
}
//****************************************************************************
void Timer::stop(){
    if(thread!=0){
        pthread_cancel(thread);
        thread=0;
    }
}
//****************************************************************************
void Timer::run(){
    double temps;
    while(1){
        gettimeofday(&start_t, NULL); // Récupération temps début
        if(fonction!=NULL) fonction(arg); // appel de la fonction définie par setCall
        temps=0;
        while(temps<wait){
            gettimeofday(&end_t, NULL); // Récupération temps fin
            temps = (end_t.tv_usec-start_t.tv_usec+2)/1000;
            temps += (end_t.tv_sec-start_t.tv_sec)*1000;
        }
    }
}


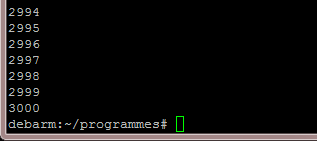
Voici un main d'exemple qui affiche un compteur toute les 10 ms pendant 30 secondes.
On doit donc avoir 3000 affichages à la fin.
main.cpp :
#include "Timer.h"
#include <iostream>
using namespace std;

// afficher le compteur et l'incrementer
void afficher(void *data){
 cout<<(*(int*)data)++<<endl;
}


int main(void) {
 int compteur = 0;
 Timer timer(10);
 timer.setCall(afficher,&compteur);

 timer.start();
 sleep(30);
 timer.stop();

 return 0;
}

vendredi 10 juin 2011

FOX Board G20 en C++ : Entrées numériques

Je continue avec une classe pour les entrées numériques.
Même principe que précédemment : on écrit "in" dans le fichier direction et on lit le fichier value.  


DigitalInput.h :
/*
 * DigitalOutput.h
 *
 *  Created on: 6 juin 2011
 *      Author: Eliott
 */

#ifndef DIGITALOUTPUT_H_
#define DIGITALOUTPUT_H_

#include <fstream>
#include <iostream>
#include <sstream>

using namespace std;

class DigitalOutput {
public:
    DigitalOutput(int pin);

    void write(unsigned int value);
    void toggle();

private:
    int pin;
    int etat;
    string racine;
};

#endif /* DIGITALOUTPUT_H_ */

DigitalInput.cpp :
#include "DigitalInput.h"

DigitalInput::DigitalInput(int pin) {
    FILE *file=NULL;

    this->pin = pin;
    file = fopen("/sys/class/gpio/export","a");
    if (file==NULL){
        cout << "Erreur ouverture fichier : /sys/class/gpio/export"<<endl;
        return;
    }
    fprintf(file,"%d",this->pin);   // on exporte la pin
    fclose(file);

    // nom de la racine du nouveau fichier
    ostringstream ss;
    ss << this->pin;
    this->racine = "/sys/class/gpio/gpio" + ss.str() ;
    this->racine += "/";

    // direction du port
    file = fopen((this->racine + "direction").c_str(),"w+");
    if (file==NULL){
        cout << "Erreur ouverture fichier : "<<this->racine + "direction"<<endl;
        return;
    }
    fprintf(file,"in");
    fclose(file);
}
//%%%%%%%%%%%%%%%%%%%%%%%%%%%%%%%%%%%%%%%%%%%%%%%%%%%%%%%%%%%%%%%%%%%%%%%%%%%%%%%%%
unsigned int DigitalInput::read(){
    FILE *file=NULL;

    file = fopen((this->racine+"value").c_str(),"r");
    if(file==NULL){
        cout<<"Erreur ouverture fichier : "<<this->racine + "value"<<endl;
        return 0;
    }
    fscanf(file,"%d",&this->etat);

    fclose(file);

    return this->etat;
}


Exemple : !bouton sur PB18 et bouton sur PB19

main.cpp :
#include "DigitalInput.h"
#include "DigitalOutput.h"
#include "Foxboard.h"

int main(void) {
    DigitalOutput led1(foxboard::PB18), led2(foxboard::PB19);
    DigitalInput bouton(foxboard::PB0);
    unsigned int value;

    while(true){
        value = bouton.read();
        led1.write(!value);
        led2.write(value);
    }

    return 0;
}

FOX Board G20 en C++ : Sorties numériques

On va commencer par la class DigitalOutput pour manipuler une sortie en mode numérique.
Pour pouvoir utiliser une patte il faut d'abord l'exporter en écrivant son identifiant dans le fichier /sys/class/gpio/export.

Un nouveau dossier est créé : /sys/class/gpio/gpio"identifiant"
On utilise ensuite les fichiers direction pour définir le sens de la patte (out ou in) et value pour définir la valeur de la patte (0 ou 1).

Voici les identifiants des différentes E/S regroupés dans un espace de nom :


foxboard.h :
#ifndef FOXBOARD_H_
#define FOXBOARD_H_

namespace foxboard {
    static const int PB18 = 82;
    static const int PB19 = 83;
    static const int PB16 = 80;
    static const int PB17 = 81;
    static const int PB2 = 66;
    static const int PB3 = 67;
    static const int PB0 = 64;
    static const int PB1 = 65;
    static const int PC14 = 110;
    static const int PC15 = 111;
    static const int PC12 = 108;
    static const int PC13 = 109;
    static const int PC9 = 105;
    static const int PC10 = 106;
    static const int PC7 = 103;
    static const int PC8 = 104;
    static const int PC5 = 101;
    static const int PC6 = 102;
    static const int PB9 = 73;
    static const int PB8 = 72;
    static const int PB23 = 87;
    static const int PB22 = 86;
    static const int PB25 = 89;
    static const int PB24 = 88;
    static const int PA28 = 60;
    static const int PA27 = 59;
    static const int PA26 = 58;
    static const int PA25 = 57;
    static const int PB28 = 92;
    static const int PB7 = 71;
    static const int PB6 = 70;
    static const int PB29 = 93;
    static const int PB26 = 90;
    static const int PB5 = 69;
    static const int PB4 = 68;
    static const int PB27 = 91;
    static const int PB11 = 75;
    static const int PB10 = 74;
    static const int PB13 = 77;
    static const int PB12 = 76;
    static const int PB21 = 85;
    static const int PB20 = 84;
    static const int PB31 = 95;
    static const int PB30 = 94;
    static const int PA31 = 63;
    static const int PA30 = 62;
    static const int PA6 = 38;
    static const int PA7 = 39;
    static const int PA9 = 41;
    static const int PC3 = 99;
    static const int PC2 = 98;
    static const int PC1 = 97;
    static const int PC0 = 96;
    static const int PA24 = 56;
    static const int PA23 = 55;
    static const int PA10 = 42;
    static const int PA22 = 54;
    static const int PA11 = 43;
}

#endif /* FOXBOARD_H_ */


DigitalOutput.h :
#ifndef DIGITALOUTPUT_H_
#define DIGITALOUTPUT_H_

#include <fstream>
#include <iostream>
#include <sstream>

using namespace std;

class DigitalOutput {
public:
    DigitalOutput(int pin);

    void write(unsigned int value);
    void toggle();

private:
    int pin;
    int etat;
    string racine;
};

#endif /* DIGITALOUTPUT_H_ */

DigitalOutput.cpp :
#include "DigitalOutput.h"

DigitalOutput::DigitalOutput(int pin) {
    FILE *file=NULL;

    this->etat=0;
    this->pin = pin;
    file = fopen("/sys/class/gpio/export","a");
    if (file==NULL){
        cout << "Erreur ouverture fichier : /sys/class/gpio/export"<<endl;
        return;
    }
    fprintf(file,"%d",this->pin);     // on exporte la pin
    fclose(file);

    // nom de la racine du nouveau fichier
    ostringstream ss;
    ss << this->pin;
    this->racine = "/sys/class/gpio/gpio" + ss.str() ;
    this->racine += "/";

    // direction du port
    file = fopen((this->racine + "direction").c_str(),"w+");
    if (file==NULL){
        cout << "Erreur ouverture fichier : "<<this->racine + "direction"<<endl;
        return;
    }
    fprintf(file,"out");
    fclose(file);

    write(0);
}
//%%%%%%%%%%%%%%%%%%%%%%%%%%%%%%%%%%%%%%%%%%%%%%%%%%%%%%%%%%%%%%%%%%%%%%%%%%%%%%%%%
void DigitalOutput::write(unsigned int value){
    FILE *file=NULL;

    file = fopen((this->racine+"value").c_str(),"w+");
    if(file==NULL){
        cout<<"Erreur ouverture fichier : "<<this->racine + "value"<<endl;
        return;
    }
    fprintf(file,"%d",value);
    this->etat = value;

    fclose(file);
}
//%%%%%%%%%%%%%%%%%%%%%%%%%%%%%%%%%%%%%%%%%%%%%%%%%%%%%%%%%%%%%%%%%%%%%%%%%%%%%%%%%
void DigitalOutput::toggle(void){
    write(!this->etat);
}


Exemple : Clignotement d'une led sur PB18

main.cpp :
#include "DigitalOutput.h"
#include "Foxboard.h"

int main(void) {
    DigitalOutput led(foxboard::PB18);

    while(true){
        usleep(500*1000);  // pause de 500 ms
        led.toggle();      // inverser état
    }

    return 0;
}

jeudi 9 juin 2011

FOX Board G20 en C++ : Mise en route

J'avais depuis un certain temps une FOX Board G20 dans mon placard, je l'ai ressortit et j'ai commencé à coder une petite bibliothèque en c++ pour manipuler les entrées/sorties.

La FOX Board G20 est un ordinateur embarqué développé par ACME Systems. Il est cadencé à 400Mhz et tourne sous linux. Plusieurs distributions de linux sont disponibles pour la carte comme Debian ou Gentoo. Pour ma part j'utilise Debian.

Site du constructeur : http://www.acmesystems.it/
Wiki : http://foxg20.acmesystems.it/doku.php


Je développe avec Eclipse sous Windows. Vous pouvez suivre cet article pour installer un cross compiler ce qui va vous permettre de compiler le code directement sur votre machine.

Pour manipuler les entrées/sorties de la carte on utilise l'interface sysfs. Cette interface nous permet par l'intermédiaire d'un système de fichier de contrôler et de récupérer des informations sur l'état des ports de la carte.

Une fois le programme compilé, vous trouverez dans le dossier de votre projet dans Debug un fichier .elf. Copier ce fichier sur la foxboard dans root/programmes par exemple.
Pour l'éxecuter : ./fox.elf